
Installing Arch Linux on Raspberry Pi 5 and fixing HDMI issues
Installing Arch Linux on Raspberry Pi 5 and fixing HDMI issues
When I decided to set up my Raspberry Pi 5 with Arch Linux ARM, I knew it wouldn't be straightforward. The Pi 5 is relatively new, and Arch Linux ARM doesn't officially support it yet. But that's part of the fun, right? What I didn't expect was the HDMI display issue that would leave me scratching my head for a while.
Why the Pi 5 is different
The Raspberry Pi 5 Model B has a unique quirk: its CPU cores only support booting in 64-bit mode. That's fine, but here's the problem—Arch Linux ARM's standard aarch64 Raspberry Pi image relies on U-Boot, and U-Boot doesn't support the Pi 5. This means the standard installation process simply won't work.
The solution? Remove U-Boot entirely and use the Raspberry Pi Foundation's kernel instead, which can boot directly. It's available as an official Arch Linux ARM package, so we're not going completely off the beaten path.
What you'll need
Before we start, make sure you have:
- A Raspberry Pi 5 Model B (I tested this with the 8 GB RAM model)
- A microSD card (at least 8 GB, but bigger is better)
- An SD card reader (USB or built-in)
- A computer running Linux for preparing the microSD card
- A wired internet connection for the initial setup
Step 1: Preparing the microSD card
We'll start with the standard Arch Linux ARM process, but with some modifications for the Pi 5.
First, let's set up some variables to make the commands easier:
export SDDEV=/dev/mmcblk0
export SDPARTBOOT=/dev/mmcblk0p1
export SDPARTROOT=/dev/mmcblk0p2
export SDMOUNT=/mnt/sd
export DOWNLOADDIR=/tmp/pi
export DISTURL="http://os.archlinuxarm.org/os/ArchLinuxARM-rpi-aarch64-latest.tar.gz"

mkdir -p $DOWNLOADDIR
(
  cd $DOWNLOADDIR && \
  curl -JLO $DISTURL
)
Now let's partition the card. We'll create a 256MB FAT32 boot partition and use the rest for the root filesystem:
sfdisk --quiet --wipe always $SDDEV << EOF
,256M,0c,
,,,
EOF

mkfs.vfat -F 32 $SDPARTBOOT
mkfs.ext4 -E lazy_itable_init=0,lazy_journal_init=0 -F $SDPARTROOT

mkdir -p $SDMOUNT
mount $SDPARTROOT $SDMOUNT
mkdir -p ${SDMOUNT}/boot
mount $SDPARTBOOT ${SDMOUNT}/boot

bsdtar -xpf ${DOWNLOADDIR}/ArchLinuxARM-rpi-aarch64-latest.tar.gz -C $SDMOUNT
This creates the partitions and extracts the Arch Linux ARM tarball to the card. So far, so good.
Step 2: Removing U-Boot and the mainline kernel
Since U-Boot doesn't work on the Pi 5, we need to clear the boot partition:
rm -rf ${SDMOUNT}/boot/*
This removes the incompatible bootloader and mainline kernel that came with the standard Arch Linux ARM image. Don't worry—we'll replace it with something that actually works.
Step 3: Adding the Raspberry Pi Foundation kernel
Now we'll download and extract the Pi Foundation kernel to the boot partition:
mkdir -p ${DOWNLOADDIR}/linux-rpi
pushd ${DOWNLOADDIR}/linux-rpi
curl -JLO http://mirror.archlinuxarm.org/aarch64/core/linux-rpi-6.1.63-1-aarch64.pkg.tar.xz
tar xf *
cp -rf boot/* ${SDMOUNT}/boot/
popd
Note: You might need to update the kernel package URL to the latest version available on the Arch Linux ARM package page. Check what's the newest linux-rpi package and use that version number.
Step 4: Safely removing the SD card
Before you eject the card, make sure everything is synced:
sync && umount -R $SDMOUNT
Now you can safely remove the SD card and pop it into your Raspberry Pi 5.
The HDMI problem
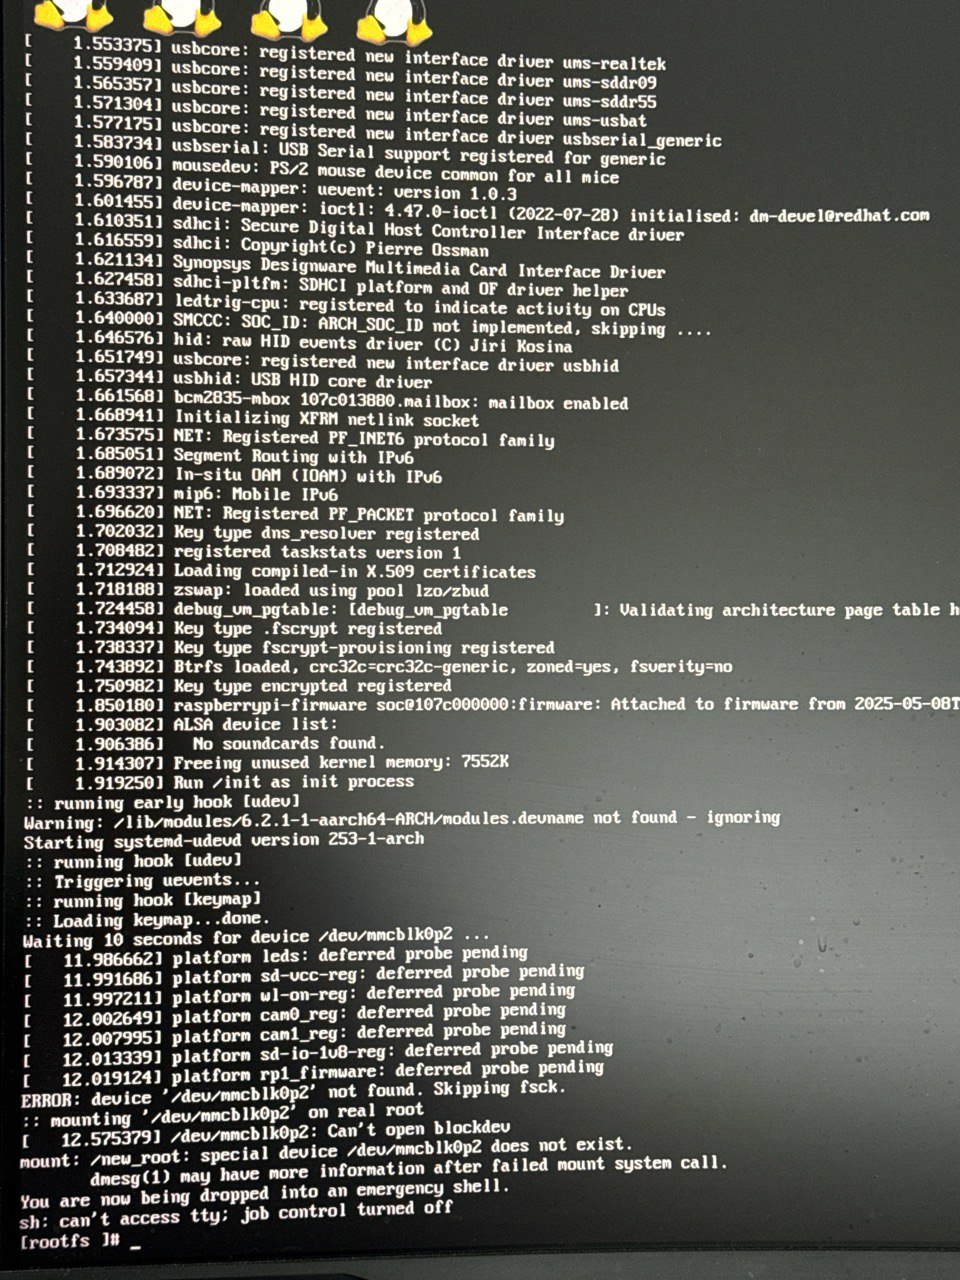
Here's where things got interesting. After completing the initial setup and booting the Raspberry Pi 5, I ran into a frustrating issue: the HDMI display wasn't working. The system seemed to boot successfully—I could see network activity, and if I had SSH access, I could connect to it. But there was no video output on the connected HDMI display.
This was particularly annoying because:
- The system boots, but you can't see what's happening
- Without display output, it's difficult to diagnose issues or complete the setup
- The problem suggests incomplete hardware initialization, particularly for video output
I spent quite a bit of time trying to figure out what was wrong. Was it a configuration issue? A driver problem? Something with the kernel?
The solution: properly installing the kernel package
The HDMI issue was resolved by properly installing the official linux-rpi package on the running system. Here's what I realised: while I had manually copied the kernel files to the boot partition, the package wasn't properly registered in the package manager. This meant:
- Kernel modules weren't properly installed
- Firmware files for video initialization were missing
- The system state didn't match the installed packages
The fix
After gaining access to the system (via SSH or serial connection), I ran these commands:
pacman-key --init
pacman-key --populate archlinuxarm

pacman -R linux-aarch64 uboot-raspberrypi
pacman -Syu --overwrite "/boot/*" linux-rpi
What this does:
- Initializes the Arch Linux ARM package signing keys
- Removes the incompatible
linux-aarch64anduboot-raspberrypipackages - Installs the official
linux-rpipackage with proper package management - The
--overwrite "/boot/*"flag ensures boot files are properly updated
Reboot and verification
After rebooting:
reboot
The HDMI display now works correctly! When the Pi reaches the login prompt:
- The HDMI video signal switches to a higher resolution
- If you have a supported fan installed, it will be properly controlled (instead of running at maximum speed)
- The wireless network adapter becomes available (you can check with
ip addr)
Why this solution works
The Raspberry Pi Foundation kernel (linux-rpi) includes:
- Direct boot support: No U-Boot needed, boots directly on Pi 5
- Proper video initialization: Includes the necessary drivers and firmware for HDMI output
- Hardware-specific drivers: Full support for Pi 5's unique hardware features
- Package management compatibility: Available as an official Arch Linux ARM package
The key insight is that manually copying kernel files isn't sufficient—the package must be properly installed so that:
- All kernel modules are in the correct locations
- Firmware files are properly installed
- The package database reflects the actual system state
- Future updates can be managed properly
System updates
While Arch Linux ARM doesn't officially support installation on Raspberry Pi 5 yet, it effectively supports running on it since all required packages are available in the official repositories. This includes:
- The latest firmware files (needed for Wi-Fi, Bluetooth, and other hardware features)
- Kernel updates for
linux-rpi - All standard Arch Linux ARM packages
Running pacman -Syu in the future will:
- Install the latest Pi Foundation kernel if an update is available
- Update firmware files automatically
- Maintain full compatibility with the Pi 5
Future official Pi 5 support
When Arch Linux ARM officially starts supporting the Pi 5, you can switch back to the mainline kernel by running:
pacman -Syu linux-aarch64 uboot-raspberrypi
The package manager will warn about conflicts with linux-rpi and ask if you want to replace it. If you proceed, linux-rpi will be removed and the new packages installed, bringing your system in line with the official Arch Linux ARM Raspberry Pi image.
Final thoughts
Installing Arch Linux ARM on the Raspberry Pi 5 requires a workaround due to U-Boot incompatibility, but it's totally doable. The process involves removing U-Boot and replacing the mainline kernel with the Raspberry Pi Foundation kernel. The HDMI display issue I encountered was resolved by properly installing the linux-rpi package through the package manager, ensuring all necessary drivers, modules, and firmware files are correctly installed and configured.
The system now runs Arch Linux ARM with full hardware support, and future updates will maintain compatibility through the official Arch Linux ARM repositories. This approach provides a stable, maintainable solution until official Pi 5 support is added to Arch Linux ARM.
References
- Arch Linux ARM on a Raspberry Pi 5 Model B - Original guide by Sven Kiljan
- Arch Linux ARM Downloads
- Arch Linux ARM Package Repository